
This is why I have a 3D printer.
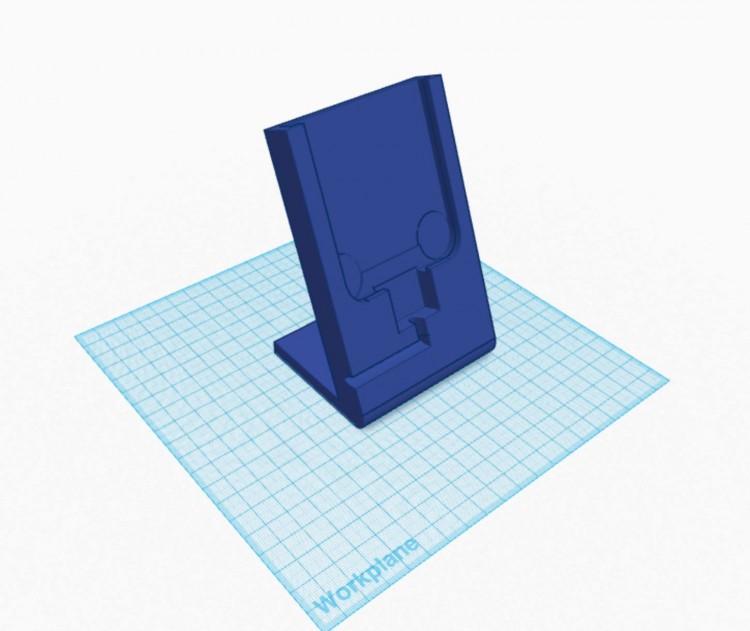
Galaxy S5 Charging Stand
It’s not the charging stand, it’s what this represents.
Yesterday, I finished the 3D Printer Build project. It’s been running for over a week; it’s printed about 35 hours worth of stuff so far, ranging from tree frogs and Minions (from Despicable Me) to fan shroud mounts and other upgrade parts for itself.
But yesterday I printed out this Samsung Galaxy S5 smartphone stand, with cutouts for the rear speaker (not visible here) and routing for the charging cable. And the design for it didn’t exist that morning.
I decided I had all the mechanical and software parts for the printer itself dialed in as well as could be asked for. I used about half my supply of cheap starter filament and a lot of glue sticks getting to that point, but I still have more.
That meant it was time for the rest of the toolchain in making this thing a useful item to have. Step one, find 3D modeling software that works for me.
Over 20 years ago I took a drafting class in high school, and one of the progressive elements of the class is that it taught AutoCAD as well as paper and pencil drafting. In those days AutoCAD didn’t do much with 3D modeling, but it had the beginnings; the ability to define basic shapes like boxes and cylinders, and you could – with a great deal of effort – use it to model out various objects.
College reinforced that with more advanced drafting training – I took the last semester of the introductory class that even bothered with paper – and in the few short years that had passed, AutoCAD had come a long way. You could actually do useful things in it faster than you could draw them by hand.
And today you can do it in a browser.
I tested a number of different tools, Blender and SketchUp and others, but I found most of them frustrating to use. Blender is incredibly powerful software aimed at something I don’t need – creating in some cases photo-realistic models for use in games and movies and software.
SketchUp is possibly the most infuriating Google project I’ve ever used. I see models that people (claim to have) produced in it, and I’m delighted those people have found a tool that works for them. I’ve no idea how, mind you, but good for them.
I settled, at least for the moment, on TinkerCAD. It definitely has some limitations and quirks, but so far at least they’re all quirks I know how to deal with through my long-ago AutoCAD training.
I laid out some rules for my software testing. I would follow the tutorials for each product until I was finished, was comfortable with the project, or had been playing for 45 minutes.
I would in each product attempt the same project – design a stand for my phone that I could use at my desk and still be able to charge it.
TinkerCAD is the only one I didn’t finish the tutorials for, because there are dozens. I kept finishing simple tutorials illustrating some design concept, and it would bring up the next one and say “okay, now do this”. When I started taking shortcuts through the tutorials, I knew I was wasting time and could use the tool effectively.
And I was right. It took about 40 minutes to finish the first design pass. Another 20 minutes of fiddling with the model and trying out different things to make sure it would work, and I sent it to the printer (with two clicks) to test the design.
Didn’t work.
But it’s easy, with these tools, to back and tweak it and try again, whether the issue is a “well that didn’t work at all” or “huh, should have given that an extra mm of clearance.”
Now I have a finished item, ready for use, that didn’t even exist as an idea 24 hours ago.
And that right there is why I have a 3D printer.
blzn
So how are you liking the MM3? A follow up review of your experience would be awesome but if that is not possible it there anyway I could see some pics of your prints? Im am in between the MakerGear M2 and MM3.
Matt Beland
Sorry, work’s been hectic – I’m liking the MM3. Works well, needs lots of care and tweaking but I expected that. Biggest things I’ve done as updates are more use of threadlocker in the calibration set screws – otherwise they drift far too rapidly. Current project is finding some better software.
I don’t have print photos handy – I’ve mostly been making functional items, brackets, repair parts for toys, things like that. I didn’t have much trouble getting to a reasonable print quality, but since I wasn’t worried overly much about aesthetics for most of my prints I didn’t focus on getting optimal surface quality.
I did a couple of toys out of ABS where the print finish was important – for those, I used an old rice cooker to vapor-bath the parts with acetone, and that worked well with a little fiddling.